6 Things You Probably Didn't Realize You Can Do With Canva
If you're on the hunt for a Photoshop alternative that's ideal for individuals with little to no design experience, then you've probably come across Canva. This simple and arguably more user-friendly platform can help you with all sorts of design projects you may have in mind, as it comes complete with intuitive editing tools and an extensive library of customizable templates. This makes Canva the perfect tool for projects as simple as an announcement poster and as complex as a multi-page product brochure. The best part is that it won't overwhelm you with a myriad of buttons and unfamiliar terminologies, unlike other editing software.
However, if you think creating and editing designs are all Canva is capable of, think again. The app has a whole world of features not many know about. So, if you want to make the most out of your Canva experience, we've compiled a list of six of the things you probably didn't know you could do on the platform.
Edit a PDF
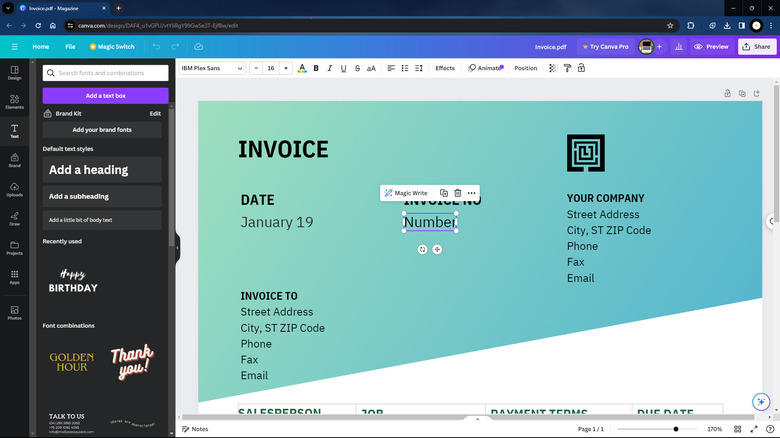
With digital documents becoming the norm nowadays, chances are you're working with PDF files all the time, from answering university homework to making a product brochure at work. However, editing PDFs on Windows, Mac, and even your phone can often be a hassle. You'll either have to subscribe to a premium PDF app or hop on a sketchy online PDF editor just to tweak your file to your liking. But the good news is that if you have a Canva account, you can readily edit your PDF directly on the platform at no extra cost — no pro account required. Here's how to do so:
- On your Canva home page, click on Upload.
- Select the "Choose files" button or simply drag and drop your PDF into the window.
- Navigate to the Projects tab.
- Under Recent, click on your uploaded PDF to open it.
- Select any text box on the PDF to modify the content.
- (Optional) Click on any design elements on your PDF to edit or delete it altogether. You can add any media or insert text boxes to the PDF as needed.
- (Optional) Click on the file name at the top to edit it.
- Once you're happy with the output, select Share at the screen's upper-right corner.
- Choose Download from the drop-down menu.
- Change the File Type to PDF Standard (or PDF Print if you intend to print the document).
- Hit the Download button.
Schedule social media post
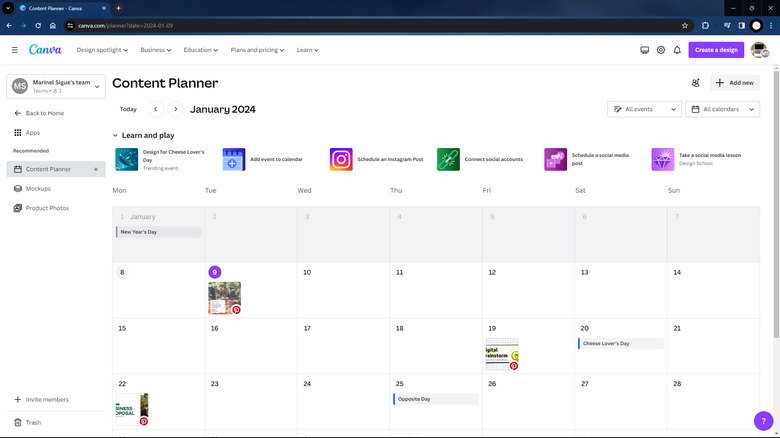
With Canva's user-friendly interface, it has become a go-to tool for small business owners or vloggers who need social media content but aren't designers themselves. However, there's more to Canva than just making the posts itself — it also lets you schedule them on various social media platforms if you're a Pro user—no need for extra scheduling tools. Canva's Content Planner, found right in the app, can do the job for you. It works with a variety of channels, including Facebook pages and groups, Instagram, Pinterest, LinkedIn pages and profiles, and even Slack. Follow these steps to access and use this tool:
- Subscribe to a Pro account if you haven't already.
- Head over to the Apps section on the left of the home page.
- Select Content Planner.
- At the top of the calendar, click on Connect social accounts.
- Pick the channels you want to link with Canva.
- Follow the on-screen instructions to connect to your channel.
- To schedule a post, hit the plus sign on your preferred date on the calendar.
- Select the three horizontal dots next to the date and time on the right panel.
- Select Change date and time.
- Enter your preferred time.
- Hit Done to lock in the date and time.
- Choose which channel you want to post the content to.
- Type in your caption.
- Select your design by clicking on "Your projects." Alternatively, you can click "Create a design" if you don't have one ready yet.
- Click on Schedule to schedule the post.
Generate QR codes
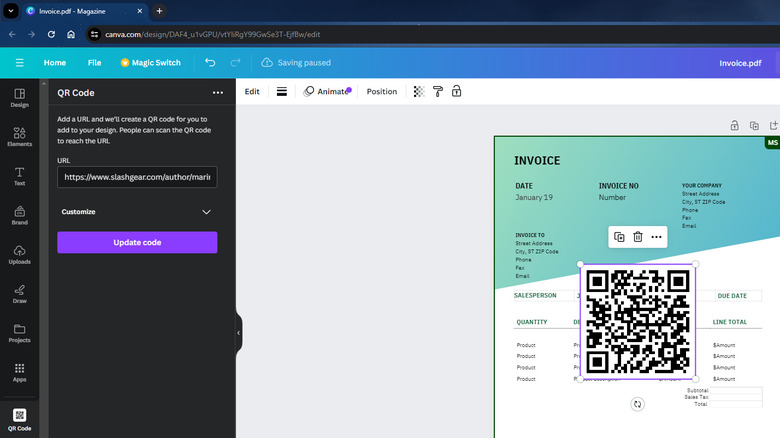
If you're making a Canva design with a QR code, say to share your cafe's Wi-Fi or a link to your social media platforms, your first instinct is probably to visit a third-party QR code generator website. Sure, they can create your QR code in a jiffy, but it's pretty inconvenient to switch to a new tab, download the QR code image, upload it to Canva, and finally drag and drop it into your design. An easy way to go about this is to just use Canva's built-in QR code generator. Follow these steps to use it:
- Log into your Canva account if you haven't already.
- Open the design where you want to add a QR code.
- Go to Apps on the left side panel.
- Type "QR Code" in the search bar.
- Click on the first result. Make sure it's the one created by Canva (you can see the name of the app creator at the top).
- Hit on Open.
- Paste your URL or type any other text content you want your QR code to contain.
- Click on Generate code. The QR code should automatically appear on your design.
- Drag your QR code to your desired position.
- (Optional) To add another QR code to your design, deselect the first QR code by clicking on a different element. Then, paste your second URL or content in the text box. Click on Generate code to insert the new QR code into your design.
Hold a live presentation
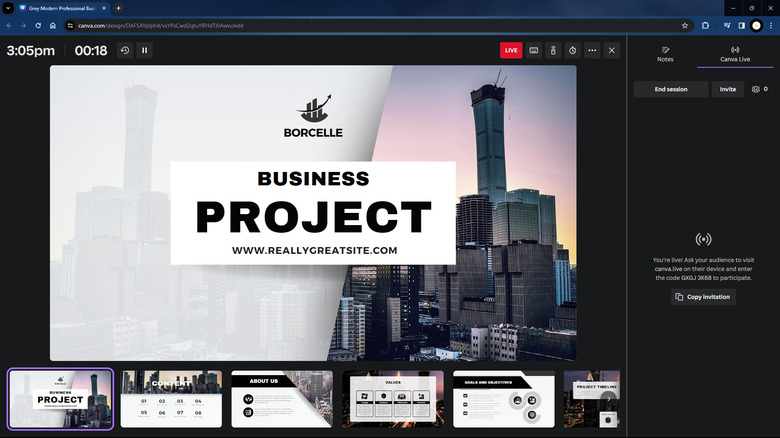
One of the best things about Canva is that it not only lets you create presentations with ease but also comes with features that help you present the slides right within Canva. This means you no longer have to download the presentation and use a third-party platform to present what you made. You can do all that and more without having to leave Canva. Among these presentation features is Canva Live, which allows your audience to interact with you and send you questions anonymously in real-time.
To use Canva Live for your next presentation, here's what you need to do:
- Open your presentation in Canva on your computer. If you have a presentation made outside of Canva, you can also upload it to the platform.
- Click on Present in the upper right corner.
- Select Presenter view.
- Hit Present to start the presentation.
- On the right-hand panel in the presenter window, navigate to the Canva Live tab.
- Click on Start new session.
- Hit the Copy invitation button and share it with your audience. Alternatively, they can simply scan the QR code on the audience window.
Once your audience joins the session, they can send in their questions, which will then pop up in your presenter window. To show a question on-screen, go to the Canva Live tab in the presenter window and click on the comment. Click on it again to hide it. To wrap up the live session, press the "End session" button in the Canva Live tab.
Translate content
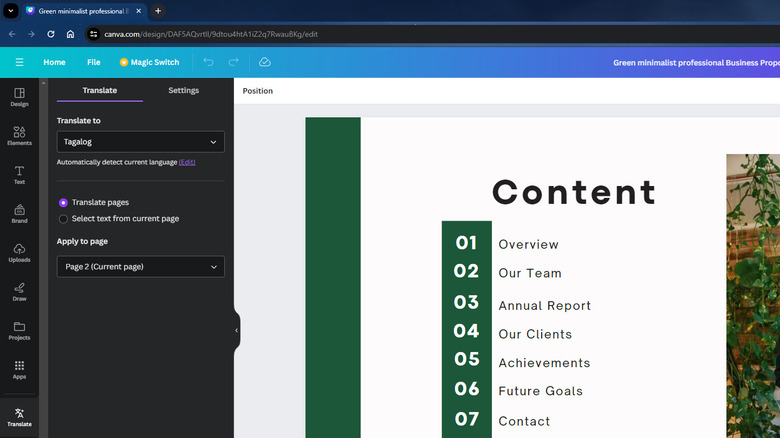
When working on a design requiring multilingual content, you normally rely on translation apps or websites like Google Translate and ChatGPT to translate your text. However, Canva actually offers a more convenient alternative with its built-in translator tool. The Translate app supports over 100 languages, including widely spoken ones like Spanish, French, and Arabic, and regional languages like Bhojpuri and Cebuano. One of the great advantages of using this feature is that it keeps your text's original font style, size, and other elements intact, so you won't have to worry about messing up your design. Here's how you can access and use this tool in Canva:
- Open the design you want to translate in Canva.
- On the left side panel, click on Apps.
- Under More from Canva, select Translate. Alternatively, type "translate" in the search bar and click on the first result.
- Select the language you want to translate to.
- (Optional) By default, Canva automatically detects the language used in your design. To change it, click on Edit next to "Automatically detect current language." Then, select your current language.
- Select whether to translate the entire page or just specific text.
- If your design has multiple pages, choose which pages you want to apply the translation.
- Once ready, hit Translate.
You should see your translated content on your design after a few moments. There are, however, some limitations to using Translate. For free account users, there's a cap of up to 50 pages. For those with a subscription, the limit is set at 500 pages per billing month.
Create a color palette
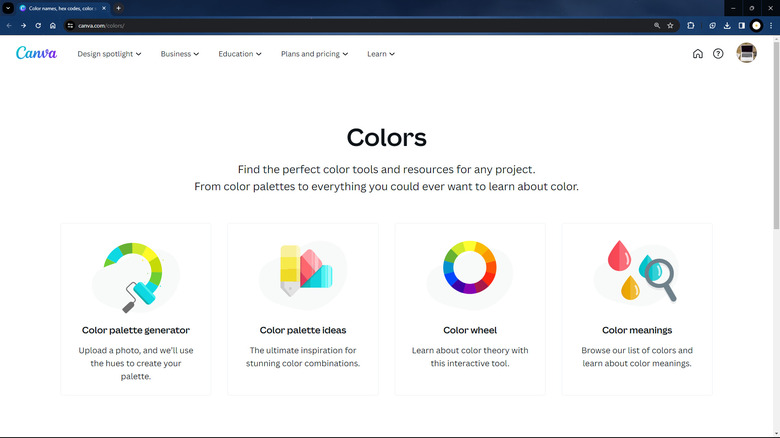
Unless you're working with a brand with predefined colors, thinking of a color palette is arguably one of the toughest parts of creating a design. Fortunately, Canva can help you in that regard. It comes complete with a Colors section featuring four nifty tools:
- Color palette generator: Extracts the four main colors of an uploaded photo to create your palette.
- Color palettes: Features almost 4,000 different color palettes for you to choose from.
- Color wheel: Allows you to create a custom color combination type (complementary, monochromatic, analogous, triadic, and tetradic) starting from a color you select on the wheel.
- Color meanings: Tells you the meaning behind a specific color. This can be handy if you want your color choices to convey specific themes or emotions.
Here's a quick guide to using these tools:
- Go to Canva Colors in your browser.
- Select your tool of choice:
- Color palette generator: Click on Upload an image to use a photo from your computer or Try demo image to use a random picture from Canva's collection. Hover over each of the extracted colors from the photo and select Copy to copy the color's hex code.
- Color palettes: Browse through the selection and select your favorite. Go to the colors and click on Copy to copy the hex code.
- Color wheel: Pick a base color, change the color combination type, and click on the hex code displayed to copy it.
- Color meanings: Search or select a color to view its details and associated combinations. Click on a combination to view it, and copy the hex codes.
- You can now use the hex codes in your Canva design.